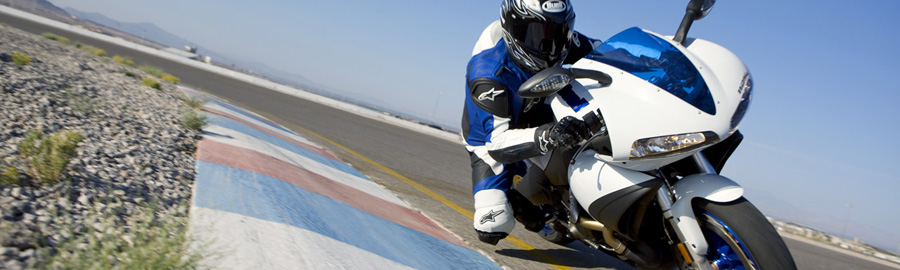
It is currently 28 Mar 2024 23:31

All times are UTC


Post new topic  Reply to topic  [ 9 posts ] 
Author Message
 Post subject: ...change wheel bearings
PostPosted: 07 May 2009 22:02 
Offline
proff. patpending
User avatar

Joined: 06 May 2009 20:20
Posts: 14705
Current ride: Victoria Sponge
Location: Bristol - Gateway to all things good
Why they fail

Bearing life is dependent on loading:
* A over tensioned belt can reduce the radial loading on the rear (fit a FS tensioner)
* Crushed spacers, as a result of over-torqueing the axles, will result in overloading the bearings axially even when at the correct torque post damage

Who makes bearings

* The stock ones are NTN, a reputable supplier.
* SKF and FAG are reputable suppliers too, are a fraction of the price and easier to get hold of in the UK.

Which bearings do I need?

For XB and 1125, SKF part numbers are:
* Front 6005-2RSH
* Rear 6006-2RS1

For XB and 1125, FAG part numbers are (can't get links to work for these prodcts on their website):
* Front 6005-2RSR
* Rear 6006-2RSR

For XB and 1125, Buell part numbers are:
* Front E0004.02A8A
* Rear E0005.02A8A

Steer clear of C3, they have increased clearance (read part-worn from new) for high temperature operation...

Should I replace my spacers at the same time?

For XB and 1125, spacer numbers are:
* Front G0325.02A8
* Rear G0323.02A8

How can I get my bearings out?

A blind bearing puller is the weapon of choice. Make sure it has the correct sized collets. For the front you need a collet suitable for a 25mm bore, for the rear, you need one suitable for a 30mm bore.

The wheel can be suspended over a suitable tyre by the puller shaft, then left to drop whilst maintaining grip on the slide hammer. This applies a steady load and a shock.

Image Image Image

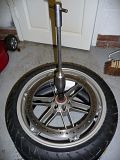
An alternative to the blind bearing puller is an expanding rawl bolt of adequate size. After inserting and expanding (careful not to wreck the spacer), a punch can be used from the opposite side to knock the bearing through.

There has been some success (difficult but do-able) using a punch from the opposite side. The angle is tight and there is only about 1mm of the bearing inner race to knock.

A warm wheel will help, you could leave it in the house overnight and/or warm the hub with a hot air gun (careful with the paint).
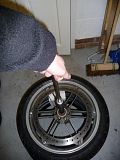
How can I get my bearings in?

The first tip is to get the bearing as cold as possible to *shrink* it. This can be done by putting the bearings in a freezer bag and leaving them in the freezer overnight.

In addition, the wheel should ideally be warm, see above.

Use some copaslip around the bearing area. This will make the insertion a tad easier, but also help to prevent the bearing and hub from becoming attached over the life of the bearing. If this happens, they are a pain to get out...

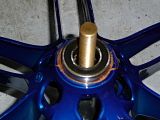
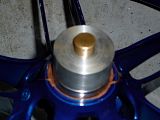
To drive the bearings in, you need to ensure they go in concentric and that you dont shag up the bore in the hub.

A number of methods exist:
* Tapping the bearings in by hand (carefully - tapping the outer race only)
* Threaded rod with large sockets on the outer race
* Threaded press with collets (metal or hard wood)
* Hydraulic press and socket

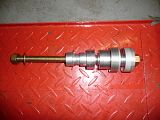
I use my fantastic do-it-all threaded brass stud with aluminium collets shown here for:
* 1" bicycle headset
* XB front wheel bearings
* XB rear wheel bearings

Image Image Image

Buell tools here.

The procedure is as follows:

1. Insert first bearing. On a single disc wheel, this will be on the disc side, on a twin disc wheel, on the left side.
2. Insert spacer
3. Insert second bearing (non-disc or right side)

If you attempt to press both bearings in at once, the spacer tube is likely to be damaged by the hub.

Tubers

The spacer on a tuber has a lot more radial movement allowing you to use a drift through the centre of the bearing. When the bearings are worn out, the spacer is easy to move. When the bearings are new, the spacer is an interference fit between the two bearings.

Tuber wheel bearings (cast wheels)

Front 6204 (x2 bearings)

Rear 6205 (x2 bearings) + 62205 (x1 bearing, it's a bit wider than the other two)

Tuber wheel bearings (PM wheels)

Front 6204 (x2 bearings)

Rear 6205 (x3 bearings)

All are 2RS (In SKF - 2RSH is preferable but 2RS1 if H is not available)

_________________
08 Specialized Langster


Top
PostPosted: 02 Jun 2010 10:33 
Bearing Puller which is a great bit of kit & a good price......

http://www.machinemart.co.uk/shop/produ ... puller-set


Top
   
PostPosted: 21 Jul 2010 20:42 
Offline
Resident Bender
User avatar

Joined: 20 Sep 2009 19:28
Posts: 1601
Current ride: EBR 1190RX
Location: banbury uk
i managed to knock up a couple of inserts to go on a slide hammer
made em and got bearings out and new ones in within 1/2 hr
bit hard to explain how i made em
but if anyones interested pm me

_________________
Buell X1
Buell xb12s
Buell 1125r
Ebr 1190rx
Bimota Db7
Norton v4rr??


http://www.aph-performance-engineering.com


Top
PostPosted: 28 Jul 2010 20:59 
Offline
User avatar

Joined: 07 May 2009 21:25
Posts: 882
Current ride: CZ 350!
Location: Notts
Found this on one of the US sites. Interesting read. Bearings-

I have spoken with folks at Buell that are quite knowledgeable on all of this, and can provide the following info.

1) The original FAG bearings (black) [comment- used on early XB's] were replaced by NTN bearings that had better seals and less hygroscopic grease. The new KBC bearings have yet again better (stiffer) seals and still better grease. They also have a better lines of communication into the bearing supplier themselves. Bottom line, the change to the bearing isn't just some cost cutting move..they ARE better.

2) The design of the wheel shoulders and internal spacer tube are such that in the worst case tolerance stackup of NEW wheels, bearings, and spacer tubes, the inner race on the bearing OPPOSITE the caliper/rotor will be seated against the inner spacer with just less than 0.5mm clearance between the rear wheel shoulder and the outer race, and just less than 0.25mm on the front wheel. All of this assumes that the bearings are installed correctly (rotor side bearing seated in wheel, spacer installed, opposite bearing installed until inner race seats against spacer tube). What this means is that IF the bearings are installed correctly, AND the spacer tube is not damaged, overtorquing the axle slightly shouldn't cause an inelastic deformation of the spacer tube. If Mongo gets a hold of it and gets brutal with the breaker bar during installation, all bets are off.

3) The bearing installation tool is designed to push on BOTH the inner and outer races in a plane. During installation of the opposite rotor side bearing, if the installation forces are applied to EITHER, but not both, of the races, you can potentially damage that bearing. If you use the old "socket on the outer race with a hammer" method, you'll probably ruin that, and possibly both bearings. You'll likely coin the bearing races, and might damage the spacer, if you seat the outer race against the wheel shoulder on that side. And regardless of the potential bearing damage, if you walk that bearing in which is easy to do with the hammer method, your interference fit of the outer race into the wheel may be compromised. Buell doesn't utilize thermal methods (i.e., hot wheel, cold bearing) for installation, they rely on process control and proper tooling.

4) When a bearing goes more than a little bad, it is possible and likely that the end of the spacer tube can be damaged. In this case, the margins afforded by the design as described in 2) above can be affected. Some bearing removal tools can also damage the ends of the spacer. So inspect that spacer tube with each bearing change.

5) Related to 4, future service manuals may provide for an inspection dimension on that spacer tube. But it isn't there now, so here are the nominals:
Rear Spacer Tube: 202.8 +/- 0.05 mm, 7.984 +/- 0.002 inch
Front Spacer Tube: 107.9 +/- 0.05mm, 4.248 +/- 0.002 inch

_________________
aka DrBagiva, DrBusqvarna, Uncle Knobhead


Top
PostPosted: 28 Jul 2010 22:53 
Offline
User avatar

Joined: 26 Jun 2010 14:38
Posts: 409
Location: Isle of Man
Interesting & useful.

Thanks!

Nige. :yup:

_________________
Sanity is in the eye of the beholder.

Arrival is the byproduct of the purpose.

BallacrainesCorner


Top
PostPosted: 17 Aug 2010 20:12 
Getting new bearings cold before fitting them:

Can anyone think of any reason why I shouldn't cool bearings using dry ice (about -30 deg C) or liquid nitrogen (-73 deg C) as this could make the job a little easier. I have access to this stuff through work.


Top
   
PostPosted: 19 Aug 2010 17:25 
What would happen to the grease at those temperatures :?


Top
   
PostPosted: 19 Aug 2010 19:20 
Offline
Moderator
User avatar

Joined: 15 Apr 2009 17:25
Posts: 11771
Location: Oswestry
It's the seals I'd be concerned about. I've just ordered some Viton 'O' rings for my TRX and the spec says they're only rated down to -20C.

_________________
If your dreams don't scare you, they are not big enough.


Top
PostPosted: 19 Aug 2010 22:12 
I think the grease would freeze at liquid nitrogen temperatures, and my guess would be that it'd be fine when it melted again. I guess I could try this out in my lab at work, however...

As for the seals, good point. The different materials will contract at different rates, which could result in them cracking. I assume it would certainly shorten their life fairly significantly.

So I guess the only sensible answer is just to cool them over night in the freezer (around -15 deg C). Shame really, was hoping for an excuse to bring some nitrogen home!

Thanks for the comments guys!


Top
   
Display posts from previous:  Sort by  
Post new topic  Reply to topic  [ 9 posts ] 

All times are UTC


Who is online

Users browsing this forum: No registered users and 3 guests


You cannot post new topics in this forum
You cannot reply to topics in this forum
You cannot edit your posts in this forum
You cannot delete your posts in this forum
You cannot post attachments in this forum

Search for:
Jump to:  
Powered by phpBB® Forum Software © phpBB Limited