'Taming of the Shoe'
When I first decided to put Quicksteel into the entry pipe to my Stealth to improve the gas flow, I used an abrasive flap wheel to roughen the internal surfaces. This produced a surface like a very rough cylinder hone to which the filler bonded well.
The subsequent cleaning after said filler has fallen out has resulted in the stainless steel pipe becoming ‘burnished’ and increasingly hard to roughen up, so that later bouts of filler fell out sooner.

The last job did at least last 1500 miles, about six good week-end rides.
One benefit of these failures is that I am able to determine how the engine characteristics change as different areas of filler disappear. The filler at the downstream side of the bend into the can seems to have most effect. Contrary to all my theories of streamlining the step where the header pipe enters, this step seems to have less effect. Maybe that 1.5mm header step helps with pressure recovery, who knows? The header pipe ends in a parallel pipe some distance from the point of twin convergence. So much for 'merge collectors'!
Certainly the first Belzona 1111 filler job I did put a lot of filler on the outside of the pipe a few inches downstream nearer the can giving a flattened bend. This may be bad in the eyes of pipe benders, but quite effective at torque production in the case of my XB.
Whatever, I decided to replace filler with steel. I was recently introduced to a local custom bike builder who gave me a few thick walled stainless steel bends to experiment with. This guy Nick is also credited with building the most powerful bike in the country. This has little or nothing to do with my little V-twin, but it sort of appeals to my sense of alchemy!

He also arrived on a Buell so omens were good.

I cut one of the bends in half lengthways to create an outside bend section. I have ground this into a trough or shoe with a cross section like a thin crescent moon so that it can be slid inside the bend into my can. The section is ground to sharp edges that sit flush with the existing pipe walls (well near enough). The idea is that the exhaust gases will see a smoother bend in only one plane with a higher velocity of flow.

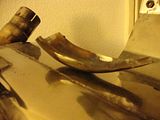
There is just enough ridge at the top and bottom welded joints of the bend in my Stealth so that a ground knife edge to the ends of the shoe enable it to be tightly press fitted (drift and hammer) into place. If it does fall out it will slide harmlessly down the can, but I don’t want to lose hours worth of cutting and grinding work.
I had to grind much of the upper reaches of this shoe away for fitting purposes and heat and beat this tang flatter so that it literally looks like a shoe horn!
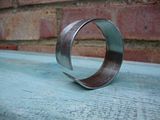
I thought the shoe was difficult, but I have also made another two tapered ring inserts to fill in areas previously filled by Quicksteel. These take much more grinding as they have to be tapered all over to fit, and because they are stainless take longer than the previous ‘plain’ exhaust steel ones I made last year. The topmost ring, which fits just below the header can be removed more easily so I may try the can with and without for comparisons.
Now if it will just stop raining!