It is currently 25 Nov 2024 11:39

All times are UTC


Post new topic  Reply to topic  [ 9 posts ] 
Author Message
PostPosted: 17 Mar 2011 17:18 
Offline

Joined: 13 Mar 2011 12:29
Posts: 176
Current ride: XB12R, FZS 600
Location: Hedge End
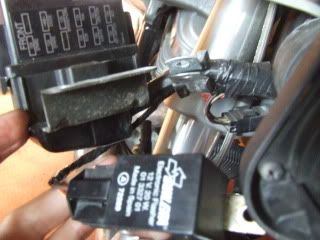
Stage 1: Remove the cowling then remove the left fuse box noting the clip that grips the wiring loom for re-assembly.

Use 3/8" spanner to remove the two bolts holding the left fuse box.
Stage 1 illustration:
Image
Remove the Spanish manufactured electronic flasher unit from the right side and the fuse box from the right side after-ward again noting the position of the clip that grips the wiring loom for re-assembly; holding the wire that feeds the flasher unit and just above the wiring branch.

Use size T27 Torx spanner to remove flasher unit.

Use 3/8" spanner to remove bolts holding right side fuse box.

stage:2
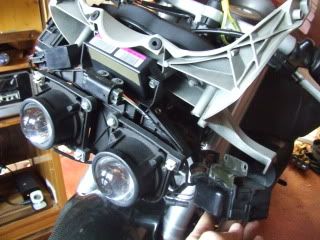
You now have access to the side bolts gripping the headlight hosting. I say hosting because it doesn't actually house the headlights but holds them. The headlight must be removed to access the horn.
Stage 2 illustration:
Image
Stage 3:

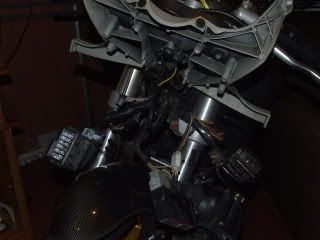
Remove the two bolts, one each side of the E.C.U, that fix the headlight hosting to the head gear. The headlights will fall free and because you have removed all other associated electrical parts from the head gear you now have full access to the horn.

Use a 3/8" socket or torque head spanner to remove the bolts from the head gear.

Stage 3 illustration:
Image
Stage 4:

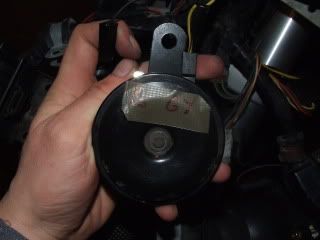
The horn is connected to the frame by a single Allen bolt. Remove the horn from the frame and check the connectors are properly fitted. Check that the wires leading immediately from them are not worn or exposed as they could be. Should the horn work loose on the allen bolt they could rub.


Top
PostPosted: 17 Mar 2011 20:15 
Offline

Joined: 13 Mar 2011 12:29
Posts: 176
Current ride: XB12R, FZS 600
Location: Hedge End
Stage 5:

Mark off so you know which way the connectors are set and remove them. Brush the terminals and re-connect.

Stage 5 illustration:

Image

Stage 6:

I didn't have a small wire brush so I used a small camping lock knife to remove ferrous metal build up where the terminals met the horn casing to reduce the risk of run off into the casing, if such a thing would occur, and roughed the connectors to a shine with it.

Re-connect the indicators if you have not already since removing the cowling so that no dead spots or shorts are likely, re-connect the horn and test it.

My horn did not work. This is a riveted but standardised unit so it cannot be repaired but is easily replaceable. Perhaps the shaking as it wore loose has jammed the moving parts inside. However it became broken it remains that I must obtain a new one with a diameter of 8cm or smaller.


Top
PostPosted: 18 Mar 2011 09:23 
Offline

Joined: 13 Mar 2011 12:29
Posts: 176
Current ride: XB12R, FZS 600
Location: Hedge End
Check brake lights before removing horn to ensure no wiring fault

Although I checked the condition of the fuse and found it to be fine while giving the matter some thought I realised it might be worth pushing the brake lever before I bought a new horn. One fuse moderates both the horn and brake light. I found that the brake light was not working when the front lever was pressed but was when the rear was pressed. I will now have to identify the fault in the wiring loom.

I'll start towards the front of the loom and bike because the rear brake does activate the brake light. I'll be checking connectors and checking for breaks in the wiring.


Top
PostPosted: 18 Mar 2011 13:17 
Offline
Site Admin
User avatar

Joined: 15 Apr 2009 17:17
Posts: 8643
Location: Manchester
Switch is fucked= very common fault :idea:

_________________
Mithered ta death.
92 MB
96 S2T
98 S1W
00 M2
01 X1
03 P3
10 CR


Top
PostPosted: 18 Mar 2011 16:39 
Offline
User avatar

Joined: 05 May 2009 20:00
Posts: 10973
Current ride: X1 2001
Location: southampton
might be worth mentioning that to remove the nose fairing
you need to remove the front indicators
the mirrors
and the bottom 2 screen screws

a multimeter is handy to check for voltage (or a lamp) on the connections
if unsure of the horn , once removed connect it direct to the battery

_________________
Feros Ferio


Top
PostPosted: 18 Mar 2011 17:18 
Offline

Joined: 13 Mar 2011 12:29
Posts: 176
Current ride: XB12R, FZS 600
Location: Hedge End
Nutah wrote:
if unsure of the horn , once removed connect it direct to the battery


How about connecting it to a battery charger?


Top
PostPosted: 19 Mar 2011 12:40 
Offline

Joined: 13 Mar 2011 12:29
Posts: 176
Current ride: XB12R, FZS 600
Location: Hedge End
Solution here:

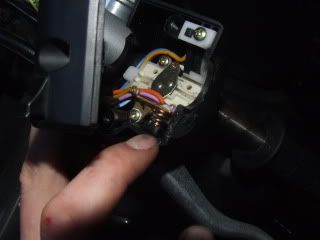
The fault was repaired by opening the housing on the left bar. Some muck or furring must have been preventing the spring from compressing fully (see illustration). I noticed that the rubber grip had bonded to the housing and wonder if some of this melted rubber or glue caused the problem. Remove two allen key bolts to remove the housing and pull from the bar taking note of the spacer.

Buell XBR 2004 horn button spring:

Image

Note:

There are holes in the bar with corresponding plugs in the grip that determine the only position that the housing will sit on re-assembly.


Top
PostPosted: 19 Mar 2011 13:13 
Offline

Joined: 13 Mar 2011 12:29
Posts: 176
Current ride: XB12R, FZS 600
Location: Hedge End
Re-assembly

Mexican manufactured horn
Headlight - tighten grip bolts on side
Right side fuse box
Spanish manufactured flasher unit
Left fuse box

Ensure ECM is placed when fixing the headlight. It bolts between the headlight hosting and the head gear.


Top
Display posts from previous:  Sort by  
Post new topic  Reply to topic  [ 9 posts ] 

All times are UTC


Who is online

Users browsing this forum: No registered users and 2 guests


You cannot post new topics in this forum
You cannot reply to topics in this forum
You cannot edit your posts in this forum
You cannot delete your posts in this forum
You cannot post attachments in this forum

Search for:
Jump to:  
Powered by phpBB® Forum Software © phpBB Limited